Some may call it efficient, others may call it lazy. Bottom line: Software Developers/Engineers want to do the most with the least effort, and that’s what the new Coveo CLI is trying to bring to us: an easy way to develop with Coveo and get your project done.
Coveo recently introduced Headless, a library offering state management and easy integration with our API – while being UI-framework agnostic – to allow you to develop with any UI framework you’d like.
However, state management and API integration without a UI are not very useful, and surely you are thinking about the big players in this space, such as Angular, React, or Vue for your project. You might be wondering, then, how painful is it to make this Headless thing work with one of them?
The answer is simple: One command.

Now, using Headless directly is not that difficult. My colleague François Lachance did a great job explaining how to leverage headless with some ‘hype’ UI framework.
[One thing to note is that this article is focused on the front-end perspective, not the back-end. For example, if you’re developing in Salesforce, you can use the Coveo For Salesforce Package to generate search tokens (more info here). But if you’re not using Salesforce and are for example using your own website to generate search tokens, you may have to do this job yourself (like in this example).]
This whole approach can be interesting to have a tailor-made UI experience down to a microscopic level, but it can take some time and effort to get started with it and see what Coveo can really do.
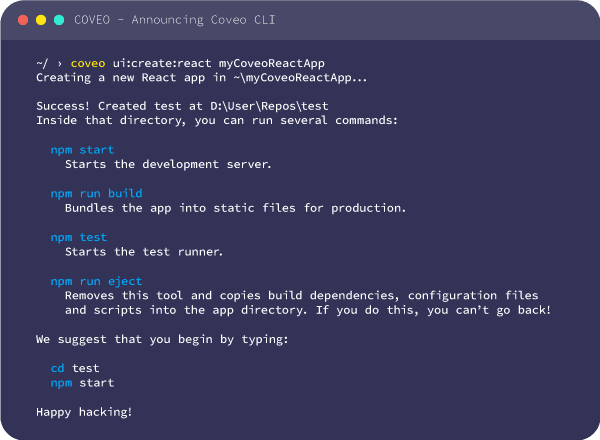
That’s where the Coveo CLI gets in the picture. Using a single command, you can bootstrap a whole project: a search page powered by Headless and with the UI framework of your choice (React, Vue or Angular, more to come!), together with a sample token provider server already set up with your Coveo Organization. And all that just one npm start away from showing up in your browser.
Now, as a developer, you might be thinking “Well that is swell and all, but how does it do all this?”

Well, behind the scenes, the CLI is actually calling the CLI of the UI framework you choose, such as cra (create-react-app) for React or ng for Angular. It does so with specific options and using predefined templates (like Angular schematics). On top of that, once the grunt work of copying all the files properly is done, the CLI creates an API key in the organization you connected the CLI with beforehand. It stores this key in an environment file in your project and uses it to power the search token server included in the project.
In essence, you don’t have to:
- Scaffold your project, basic UI and headless are ready to go right away.
- Setup a developer server for authentication or generate an API Key in the Coveo Platform, both are included in the scaffolding of the project.
Now, open a terminal in the folder of your brand new project, type npm start, open your browser to see what’s what, and start coding!
That’s but our first step towards helping you, as a developer, be successful with Coveo. You get to provide great search with less effort. In the future, we plan to offer SDKs allowing you to easily push content to your Coveo Sources, together with automation tools allowing you to manage your Coveo deployment with first-hand version control support and many other tools, all directly accessible in the CLI.
We are eager to see what you build using the Coveo CLI! Do not hesitate to come share your realizations, ideas or questions on our GitHub Discussions! (Did we mention that the whole Coveo CLI is open-source and based on the same tech as the SFDX CLI?)
Dig Deeper
If you want to learn more about the CLI, checkout our GitHub repository, or watch our Developer Hours session where my colleagues Olivier and Yassine presents and demo the CLI:


